Friday, October 21, 2011

faves on friday

 in deciding where I wanted to go with this little blog and what I want to post I decided I want to be sure that a few regular posts begin each week.  one of these posts is little things in my week that make me happy.  life has had some hard moments in the past few months and my mind has been on some heavy topics.  I never want to forget that through everything joy can be found.  my joy and peace is found in One who is greater than me or my life's circumstances... because of that I am thankful.  I am filled with joy and can rest in how great the little things can be.

here are some moments that make me smile from the lens of my camera phone

a pumpkin pie shake from my favorite, fanci freez, is a great fall treat

sewing a twirly skirt for a 5 year old on her birthday week... with an adorable zipper flower


I made a "no knit" scarf

new riding boots from anthro that are a perfect taupe-y gray and were hugely on sale!

kindergarten field trip to the pumpkin patch.  have I ever told you I LOVE my job??


when requesting a pennant from my alma mater I was pleasantly surprised with an entire 
goody package... it was amazing, to say the least!

and my week has ended on the couch, sick.  sipping tea, cuddling puppies, and surrounded by tissues.

that was my week, how has yours been??  I am focusing on remembering the blessings in my life this week.  what about you, what is your focus this week?

Monday, October 17, 2011

a fresh start


my blog has been down for a little while now.  I guess for about a week.  I think that technology is my friend most days, but then some days I really mess it all up.  I upgraded my phone and in the process of changing the phone over it synced up with my google account... I saw this little folder in the photo gallery that had all of the photos from my blog in it.  I didn't think that it was necessary that I have those photos on a gallery on my phone... so delete them I did!

I didn't realize what happened until a few days later.  I saw the big black boxes with exclamation points in them where my photos used to be, but I just blamed it on blogger and thought she was having a hard day.  I mean, my header was even gone too... so it's only obvious, right??

a couple days passed and I received a comment... I realized that it was only me that was having this problem, not all blogger users, and it was a big problem.  

I have spent some time trying to decide what I was going to do.  at one point I wanted to be done with blogging all together.  I've thought about that before.  then I wanted to start a new blog and delete this one. then I wanted to just get everything going again. --- I settled on a compromise.  I went through all of my posts and kept the ones I really like.  I have been working on uploading photos to those posts again.  I may have to delete a few more though because I can't find the original photos.  

I have a fresh perspective on this blog, what I want to do with it, what I want to share, and what type of posts I want to have.  please stick with me on the journey... hopefully it will only get better!


Monday, October 10, 2011

an office update

the school year is off to a great start!  I cannot believe the first quarter is going to be done in just a few short weeks.  I had fun putting together my office last year, but I really wanted to do more this year.  the husband and I spent a weekend painting the walls a neutral beige... I wanted anything other than the white it was!  We moved around the furniture and brought in the projects I had worked on over the summer (lamp, owl), as well as some new pillows, painted bird cages, colored baskets, and more fabric.  I like how it turned out a lot.  I am happy to be there every day.


Saturday, October 8, 2011

wise owl


this summer, while my best friend was visiting, we took on a little project.  I had seen this adorable owl artwork on pinterest and put it on the top of my must do list.  rachel has done a lot of little painting projects and I have done NONE.  so I hoped that she could maybe help me out when she came to visit.... thankfully she was willing!

we started at the craft store to purchase a canvas and some paint.  I used a wall color I had at home already as the base.  I painted the entire canvas in this muted aqua/teal color.


while the base coat was drying we created a template out of tissue paper.  we first measured and cut the tissue paper to the exact size of the canvas.  we then folded it in half and looking at the photos from the original post rachel drew the owl on the paper. we folded the paper in half to be sure to have a symmetrical owl.


I then cut out the template and traced it onto the canvas.


then we painted the owl on to the canvas.  the more paint in your brush the better because it goes on more smoothly.  a good brush and quality paint is key... I always use toll paint type paint and have to go over it again and again.  this time I bought a high quality acrylic paint and it worked much better!


and here is the finished painting hanging in my office at school... next to some of my favorite photos and, of course, mr. potato head!


Saturday, October 1, 2011

an inspired lamp

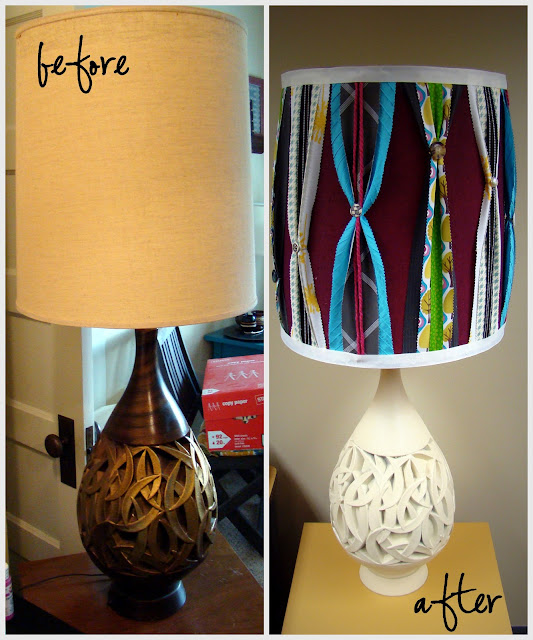
a few months ago I helped my dad move some furniture out of my great grandparents' house.  in the process there were two lamps that I spotted... they were pretty fabulous, but I didn't know just what to do with them.  after pondering it for a few months, buying a few different fabrics, and googling how to recover a lampshade I finally figured out what to do.  I did a search at my favorite store, anthropologie, for some lamp shade inspiration.  my lampshade went from this... to this!


first, I had the original lamp.  I knew I was going to repaint the base, simple, right?  well, then after looking at paint I decided, I'm going to paint the shade too!  so to the hardware store I went and found two paint colors that would work.  

then, I scoured my fabric pile, and the bags of clothes I had ready to donate to the thrift store.  I love using fabric from clothing for projects because it has so much texture and more character than craft store fabrics for a fraction of the cost (especially if I'm just planning on donating it anyway!).  I put together 3 patterns--- 1 wide fabric, 1 in between width fabric, and 1 narrow fabric.  I measured the diameter of the shade, divided it by the number of strips I wanted to have (I wanted 12) and then cut my widest strip to that width.  I think mine ended up being 3.5 inches, 2 inches, and 1 inch wide.  I did four of each pattern and repeated them around the shade-- I first sewed the three fabric strips together (optional) to make one big strip-- then hot glued them to the top and bottom of the shade.


after all the strips were on the shade, I used hemp jewelry twine to cinch the fabric strips at different heights around the shade.  there was somewhat of a pattern to this, but no measuring.


I then hot glued grosgrain ribbon along the top and bottom of the shade to hide my unfinished edges of fabric.


from my button collection I pulled 12 mismatched buttons that I liked and hot glued one on top of each knot of twine on the fabric strips.


I put the shade back on to the lamp base, and that's it. this was a pretty huge lamp.  the hardest part was deciding what to do.  once I had decided it wasn't as difficult as I thought it was-- it ended up pretty straight forward actually.  I still have one more lamp in it's original condition... should I try a second?


I'm linking up to Tatertots and Jello